Scheduling Feature Flag Deployment
Use Launch Darkly? Love their feature flagging and a/b testing features? Like reading blog posts that sounds like an informercial? Umm...
Anyway I use Launch Darkly at my workplace (I work at an airline company spelt with a Q and I live in Sydney Australia) and I recently faced a challenge with zero dark thirty deployments.
No no what I meant was I had feature flagging in place in my app, and I had to turn flags on (and off) at unearthly hours like 12:01 AM. So being a hacker, I wasn't going to lie down and wait for 12:01 AM to come by and turn on a switch. No sir! I am much much smarter than that. Instead, I spent sleepless nights doing 30 hour days to write a node app that will do it for me. Take that zero dark thirty deployments!
The problem
Need to turn flags on/off automatically at a specified scheduled time.
The solution
A cron job that uses launch darkly apis to automatically turn on/off flags.
Enough talk, show me some code
Using the rest apis, you can update your flag with something like this:
const headers = {
  Accept: '*/*',
  'Content-Type': 'application/json',
  Authorization: 'your-api-key',
  'accept-encoding': 'gzip, deflate'
};
const body = JSON.stringify([{
  op: 'replace',
  path: '/environments/test',
  value: true,
}]);
const url = 'https://app.launchdarkly.com/api/v2/flags/default/your-key';
const response = await fetch(url, {
    method: 'PATCH',
    headers,
    body
});
Of course you'll need to add some defensive programming for error catching and retries plus configuration for test and production environments plus notifications when updates are successful/not successful, and the list goes on.
If you go down this path, you soon realise that this is not a trivial task by any means. An ad-hoc solution like this involves hard coding flag names and continual updates which are almost as bad as waking up at 12:01 AM to do the deployments manually.
Enter ld-scheduler.
ld-scheduler
With ld-scheduler, you do this from your node app:
yarn add ld-schedulerthen
import ldScheduler from 'ld-scheduler';

ldScheduler.runEveryXSeconds({
  environment: 'test',
  apiKey: 'your-secret-api-key',
  slack: 'your-slack-webhook-url'
});
and you schedule your flags through launch darkly's dashboard:
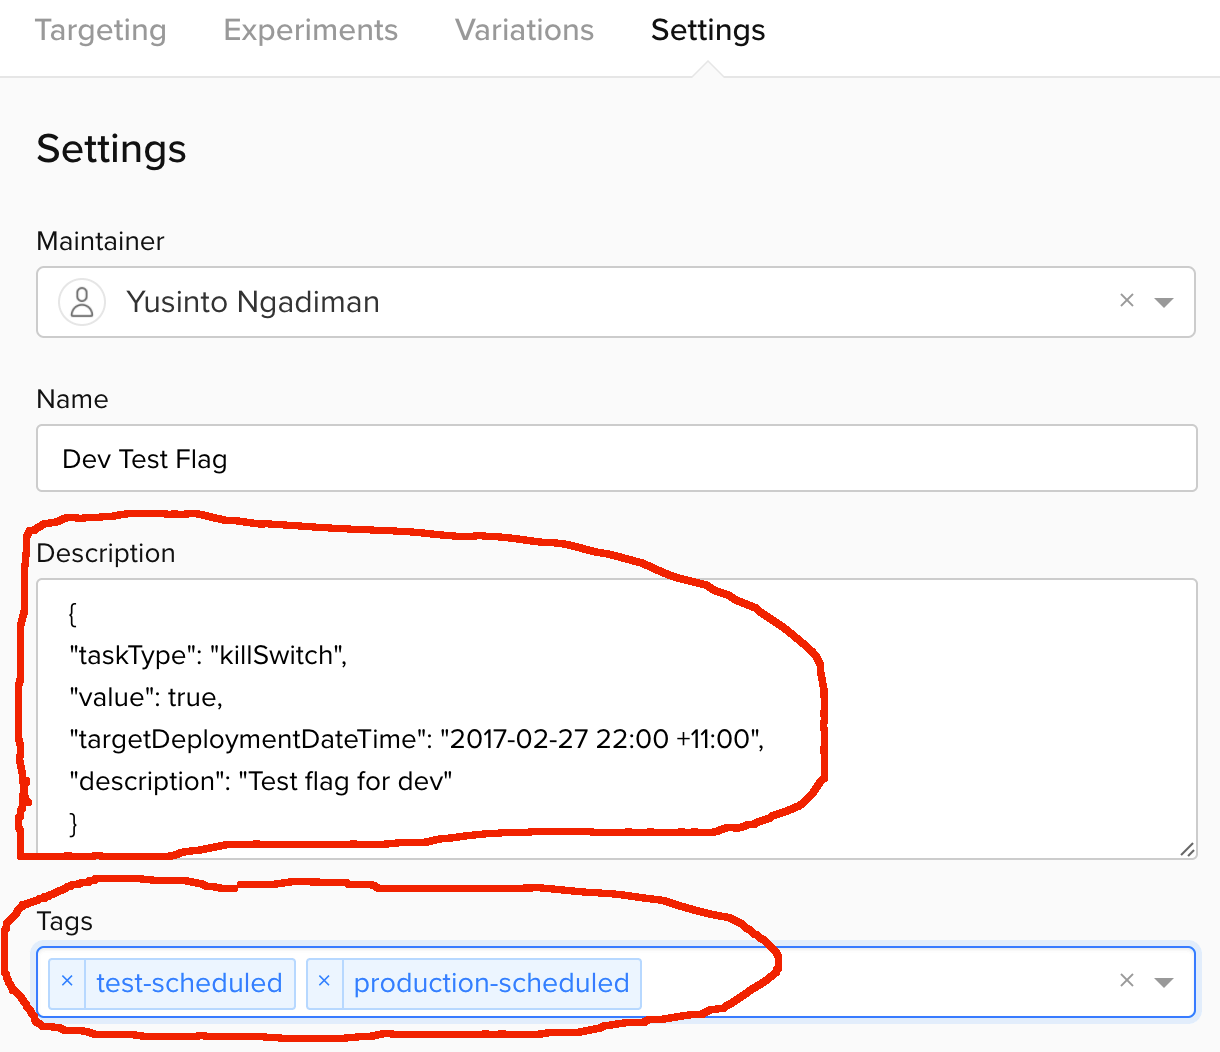
HACK: We hijack the description field to store our scheduling config as a json object where:
- taskType is killSwitch
- value is true (kill switch on) or false (kill switch off)
-
targetDeploymentDateTime must be in YYYY-MM-DD HH:mm Z
NOTE: the UTC offset at the end is especially important because ld-scheduler uses moment which will use the host's timezone if it is not specified. That means if you deploy ld-scheduler to the cloud say on aws lambda where the machine clock is set to UTC timezone, then your flag will be deployed at UTC time, which is probably not what you want unless you are living in London!
- description is a textual string for the purpose of human readability
AND you need to set a tag called `${yourEnv}-scheduled`. For example, if you are scheduling a flag in the test environment, your tag should be called "test-scheduled". Likewise if you are scheduling it in production, you need to add a "production-scheduled" tag.
When ld-scheduler runs, it will set your flag on/off according the the json configuration. It will also remove the `${yourEnv}-scheduled` tag so it does not get reprocessed. If there's no other scheduled tags, then ld-scheduler also sets the "Description" field to the json.description string, thereby deleting the json config replacing it with the description string.
This way, you can safely run 2 instances of ld-scheduler; one for each environment without having to worry about race conditions.
Extra
ld-scheduler supports a second taskType "fallThoughRollout" which you can use to set the default fallThrough rollout percentage:
{
    "taskType": "fallThroughRollout",
    "targetDeploymentDateTime": "2017-03-3 02:33",
    "description": "Human readable flag description",
    "value": [
        {
            "variation": 0,
            "weight": 90000
        },
        {
            "variation": 1,
            "weight": 10000
        }
    ]
}
where variation 0 is true and variation 1 is false. Weight is in mili-percentage (if there's such a word) i.e. 90000 === 90% and 10000 === 10%. Of course you would enter this json object in the "Description" field of your flag settings in launch darkly's dashboard AND set a `${yourEnv}-scheduled` tag.
Conclusion
Check out the sample code for a working example and let me know if this is useful (or not)!