Change marker image onPress in react-native-maps
Recently I started a new pet project which involves maps and markers on ios and android. Of course I started this new project in react native. I was expecting a somewhat challenging times ahead because it has been a few months since I last did react native development. The landscape has definitely improved, and I feel so fortunate to be a javascript developer at this present moment because of awesome tools like react-native at our disposal. The possibilities are truly endless.
Airbnb has open sourced react-native-maps which made it so easy to integrate mapping capabilities with your app. There are steps to follow to set it all up but it's not that hard.
All the code in this blog are available on github.
The problem
Need to display custom map markers on react-native-maps. Then, onPress of a marker, change that marker image so the user can see it has been selected. The problem is there is no direct way to get the ref of the selected marker. Even if there is, there is no setImage method to change the marker image.
The solution
Out of the box, there's already an onPress event handler with MapView.Marker which is a good starting point. We will use this along with the ref and image props (also supported out of the box) to solve our problem.
Are you done talking? Show me some code!
So first things first, you need to install and link react-native-maps:
# stick with 0.13.0 to avoid unresolved issues in ^0.14.0
yarn add react-native-maps@0.13.0
then link it
react-native link react-native-mapsGOTCHA react-native-maps requires babel-plugin-module-resolver as well otherwise you'll get this error: Unknown plugin module-resolver. This is a bug which should be fixed in a later version.
yarn add babel-plugin-module-resolverThen we can write some code to render a basic map like this:
import React, { Component } from 'react';
import {AppRegistry, StyleSheet, View} from 'react-native';
import MapView from 'react-native-maps';

export default class MapMarkers extends Component {
  state = {
    region: {
      latitude: 1,
      longitude: 1,
      latitudeDelta: 0.0043, // hardcode zoom levels just for example
      longitudeDelta: 0.0034,
    },
  };

  componentDidMount() {
    navigator.geolocation.getCurrentPosition(
      position => this.setState({
        region: {
          ...this.state.region,
          latitude: position.coords.latitude,
          longitude: position.coords.longitude,
        }
      }),
      error => alert(JSON.stringify(error)), {
        enableHighAccuracy: true,
        timeout: 20000,
        maximumAge: 1000
      }
    );
  }

  // note that you need to style the map, otherwise you'll get
  // a blank screen
  render() {
    return (
      <View style={styles.root}>
        <MapView style={styles.map}
                 showsUserLocation={true}
                 followsUserLocation={true}
                 initialRegion={this.state.region}
        />
      </View>
    );
  }
}

const styles = StyleSheet.create({
  root: {
    flex: 1,
    justifyContent: 'center',
    alignItems: 'center',
  },
  map: {
    position: 'absolute',
    top: 0,
    left: 0,
    right: 0,
    bottom: 0,
  },
});

AppRegistry.registerComponent('mapMarkers', () => MapMarkers);
iOS Simulator Setup
Before you run this in the simulator, you'll need to set a custom location in the ios simulator. We'll only be demoing on ios only for this blog.
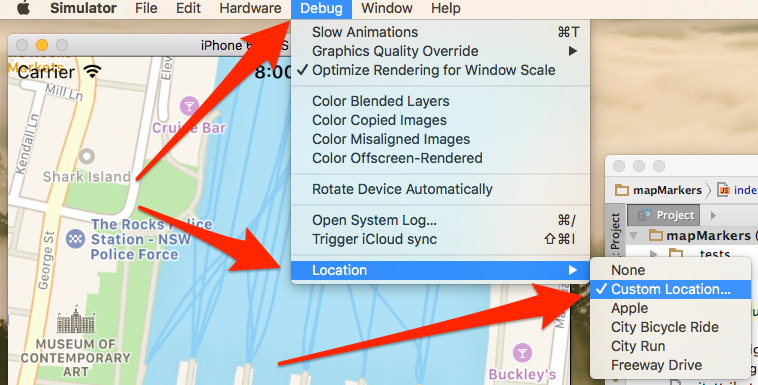
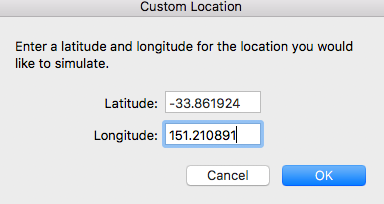
Set the custom location to Cafe Sydney -33.861924, 151.210891. If you haven't been, you have to! It's an awesome restaurant!
Run the project
react-native run-iosYou should see a map view with the user location set to Cafe Sydney in Australia. Now let's add a few markers.
// Add these at the top of the file, straight after the imports
const RESTAURANTS = [
  {
    key: 'Cafe Sydney',
    title: 'Cafe Sydney',
    description: 'Customs House, 31 Alfred St, Sydney NSW 2000',
    latLong: {
      latitude: -33.861924,
      longitude: 151.210891,
    },
  },
  {
    key: 'Four Frogs Creperie',
    title: 'Four Frogs Creperie',
    description: '1 Macquarie Pl, Sydney NSW 2000',
    latLong: {
      latitude: -33.861755,
      longitude: 151.209941,
    },
  },
  {
    key: 'Tapavino',
    title: 'Tapavino',
    description: '6 Bulletin Pl, Sydney NSW 2000',
    latLong: {
      latitude: -33.862512,
      longitude: 151.209490,
    },
  },
];

  // then modify your render method to look like this
  render() {
    return (
      <View style={styles.root}>
        <MapView style={styles.map}
                 showsUserLocation={true}
                 followsUserLocation={true}
                 initialRegion={this.state.region}
        >
          {
            RESTAURANTS.map((m, i) =>
              <MapView.Marker
                coordinate={m.latLong}
                title={m.title}
                description={m.description}
                key={`marker-${i}`}
              />
            )
          }
        </MapView>
      </View>
    );
  }
You should see 3 markers on the map. Now we want to use a custom image for our marker. MapView has an image prop we can set so that's easy. Then onPress of a marker, we want to change this image to a different one to show the user that it has been selected. Again MapView has an onPress prop which we can use to set a custom callback when a marker gets pressed.
Here's the trick, onpress of a marker, we have to pass the index of the selected marker and save that to state. Then on the image prop, we can inspect if the marker being rendered matches the selected index in state, and use a different image if so.
// At the top of the file after imports, we require our marker images
const marker = require('./assets/images/marker.png');
const selectedMarker = require('./assets/images/marker-selected.png');

// Then in our class
onPressMarker(e, index) {
    this.setState({selectedMarkerIndex: index});
}

// Then in our render method, we specify onPress and image props.
// For brevity, I only include the relevant bits of code here
RESTAURANTS.map((m, i) =>
  <MapView.Marker
    coordinate={m.latLong}
    title={m.title}
    description={m.description}
    key={`marker-${i}`}
    onPress={(e) => this.onPressMarker(e, i)}
    image={this.state.selectedMarkerIndex === i ? selectedMarker : marker} // this is the crux of the blog
  />
)
That's it!
Conclusion
Check out the complete code on github. Let me know if this helps!