Docker is dead long live Kubernetes
Kubernetes rocks. Kubernetes engine to be exact. I was so inspired by Kelsey Hightower's presentation at KubeCon 2017 I spent the next 2 weeks migrating my entire pipeline from Jenkins/AWS/Terraform to Google Cloud Platform (GCP for short) and the Kubernetes Engine. It's the best decision I have ever made.
Ok so the title is a little dramatic. Kubernetes uses docker so it doesn't actually really kill docker, it merely pushes it further into the background. That means you are free to focus on the bigger picture, which is your end to end pipeline and your code. During my migration, I found that apart from the dockerfile and a docker build, I didn't really have to touch docker much. It's a sign that the docker stack has matured.
In this blog I'll walk you through how to set up a continuous dev pipeline on GCP and the Kubernetes Engine.
Goal
During development, the dev test cycle is predictable and well-defined. You write code, it runs locally and pass all the tests then you push your code to git. The intent is clear. Pushing to git means you want to see that code running on an environment somewhere. This environment should also be predictable and well-defined. Without doing any more work, you should be able to open your browser and run the code you just pushed in this well-defined environment.
The goal of this tutorial is to build a pipeline that does exactly that. At the end of this post, you should be able to:
- Create a new feature off master, code and test locally.
- Push to git.
- Browse to a well-defined feature url which has the new code running.
Step 1: Create a Kubernetes cluster
Jump into google cloud console and under the main menu, go to Compute -> Kubernetes Engine -> Kubernetes clusters and click on Create Cluster. You'll see a screen like below, you only need to touch 3 fields:

- Name your cluster feature-cluster. When we push to git, we'll deploy our feature to nodes running on this cluster.
- Pick a zone that's closest to you. The Zonal and Regional option refers to the location of your Kubernetes master. Zonal means your master service will be running in a single zone that you picked. Regional means your master service will be running in multiple zones in that region for redundancy. To keep things simple for this demo we'll stick with zonal.
- Pick the latest cluster version to get all the latest features.
Leave the remaining default settings e.g. 3 nodes in the cluster on Container-Optimised OS and click create. It takes some time for google to create your cluster because it has to provision the nodes. While that's cooking, we'll create the build job.
Step 2: Create a build trigger
In the console menu, go to Tools -> Container Registry -> Build triggers. Add a new trigger. Select your git source (I use github) and repo and authorise container builder to access it. Then you'll get to the Edit Trigger page like below:
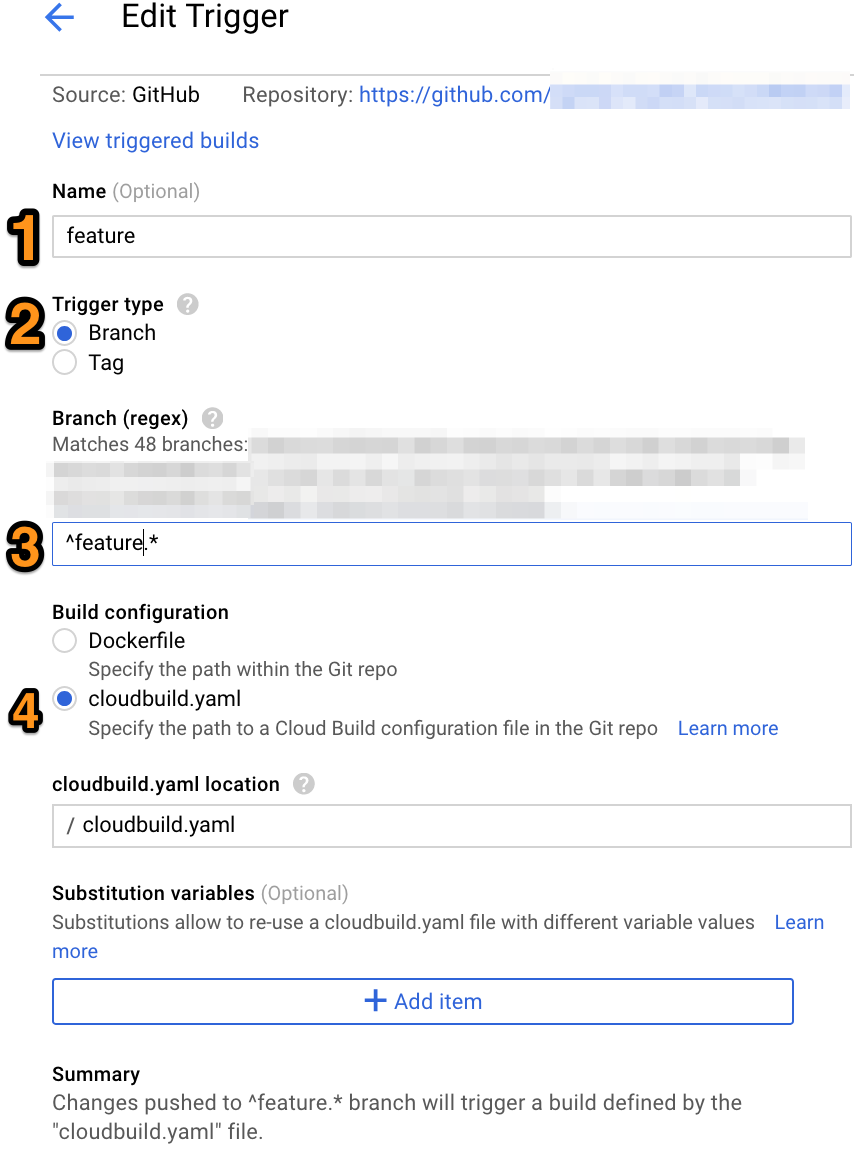
- Give your trigger a name, I name mine feature because it gets triggered by a feature push and builds and deploys that feature.
- Set the trigger type to branch, because we want to trigger a build when a feature branch push happens. There is also an option to trigger on tag push, which is useful for production deployment (when you create a release tag) but we'll cover that in a future post.
- Set a regex to match the feature branch names. By convention I enforce the following convention for features: feature-[JIRATICKETNUMBER]-description. All the developers follow this naming convention when they create a new feature branch. Once a convention is in place, you can set a regex expression here to match your feature branches.
- You define your build steps in the cloudbuild.yaml file. Set the location of cloudbuild.yaml so container builder can find it in your repo. I set mine to the root of my repo.
Step 3: cloudbuild.yaml
Container builder uses this file to execute a series of steps to build and deploy your app. Each build step specified here is a container running in its own shell. For our demo, we'll use the cloudbuild.yaml below:
steps:
- name: ubuntu
  id: generate-image-tag
  entrypoint: bash
  args:
  - '-c'
  - echo $(date) | md5sum | awk '{print $1}' > tag.txt

- name: gcr.io/cloud-builders/docker
  id: docker-build-push
  entrypoint: bash
  args:
  - '-c'
  - |
    tag=`cat tag.txt`
    docker build -t "gcr.io/gke-playground/$BRANCH_NAME:$tag" .
    docker push "gcr.io/gke-playground/$BRANCH_NAME:$tag"

- name: gcr.io/cloud-builders/kubectl
  id: deploy-infrastructure
  env: ['CLOUDSDK_COMPUTE_ZONE=australia-southeast1-a', 'CLOUDSDK_CONTAINER_CLUSTER=features']
  entrypoint: bash
  args:
  - '-c'
  - |
    tag=`cat tag.txt`
    sed -e "s|_BRANCH_NAME|$BRANCH_NAME|g" -e "s|_TAG|$tag|g" deployment-template.yaml | tee deployment.yaml
    gcloud container clusters get-credentials --project="gke-playground" --zone="australia-southeast1-a" "features"
    kubectl apply -f deployment.yaml
There are 3 build steps in our cloudbuild.yaml file. Each step has a name and and an id. The name field refers to a docker image that the build step will pull and run to execute the step. Container builder supports a common set of builder images you can use as build steps. There are also community images. In this example we'll only use google builder steps because it's more than sufficient for our needs.
The id field is optional but useful to specify because it will be displayed in the build logs. Otherwise you'll see the name field instead, which is not as informative. Also by specifying an id, you can make subsequent build steps to waitFor this build step so those child steps can run concurrently. Speed up baby! So cool!
In the first step, we generate a random tag (based on an md5 hash of the current timestamp) for our docker image. Don't always tag your images as latest because if the tag is unchanged, kubernetes won't be able to detect that the image has been updated and won't update your pods. We output the md5 hash to a text file in the checkout directory. The checkout directory persists across steps so we can access this text file later in subsequent steps.
In the second step we build and push our docker image. We get the md5 hash from step 1 above and save it to a shell variable. We can then use this to build and push our docker image.
Now we are ready to deploy our image!
Step 4: deployment-template.yaml
Let's take a look at the third step which runs kubectl. This step deploys our docker image to the Kubernetes cluster. Note that this step runs the gcr.io/cloud-builders/kubectl image, but we specified the entrypoint as bash meaning that the container will run the bash command when it starts rather than kubectl. This is a useful technique if you need to pre-run some commands prior to executing the main command. We'll come back to this in a minute after inspecting deployment-template.yaml:
kind: Deployment
apiVersion: apps/v1beta1
metadata:
  name: _BRANCH_NAME-deployment
  labels:
    branchName: _BRANCH_NAME
spec:
  replicas: 2
  selector:
    matchLabels:
      branchName: _BRANCH_NAME
  template:
    metadata:
      labels:
        branchName: _BRANCH_NAME
    spec:
      containers:
      - name: _BRANCH_NAME
        image: gcr.io/gke-playground/_BRANCH_NAME:_TAG
        ports:
        - containerPort: 80

---

kind: Service
apiVersion: v1
metadata:
  name: _BRANCH_NAME-service
  labels:
    branchName: _BRANCH_NAME
spec:
  selector:
    branchName: _BRANCH_NAME
  ports:
  - protocol: TCP
    port: 80
    targetPort: 80
  type: LoadBalancer
This is a standard kubernetes resource yaml specifying two resources to be created/updated in the cluster:
- A deployment containing our pod spec
- A service to expose our pods to the external world so that it's accessible via the internet.
We use a placeholder string BRANCHNAME and TAG which gets replaced by the real $BRANCHNAME and our md5 hash using the sed command in our build step:
sed -e "s|_BRANCH_NAME|$BRANCH_NAME|g" -e "s|_TAG|$tag|g" deployment-template.yaml | tee deployment.yamlLike in the previous docker-build-push step, we get the tag from the md5 hash from step 1. $BRANCH_NAME is injected by the Container Builder as an environment variable to all build steps. This is the git branch name that triggers the build. There are other environment variables you can use.
This produces a new deployment.yaml which gets used by kubectl for deployment:
kubectl apply -f deployment.yamlThis way, we can deploy each branch to its own infrastructure mirroring our git branching strategy.
Step 5: Test the app!
Push a git commit to a feature branch and watch the magic happens! It takes a while for google cloud to assign an external ip to our service. You can check under Compute -> Kubernetes Engine -> Discovery & load balancing. The Endpoints column should display a valid external ip when it's ready. Then you can hit that link and your app should be running!
Conclusion
Deploying my app used to involve many moving parts: Jenkins, ec2 instances, load balancers, terraform, ecs. Kubernetes Engine greatly simplifies this by encapsulating many of the moving parts. When used in conjunction with Container Builder, the dream of a continuous end to end build pipeline suddenly becomes somewhat easier to achieve. This is just the tip of the iceberg, I am so excited!
In part two of this series I'll walk you through the teardown process to complete the feature development pipeline. You don't want unused resources running in the cloud burning your wallet! Till next time.